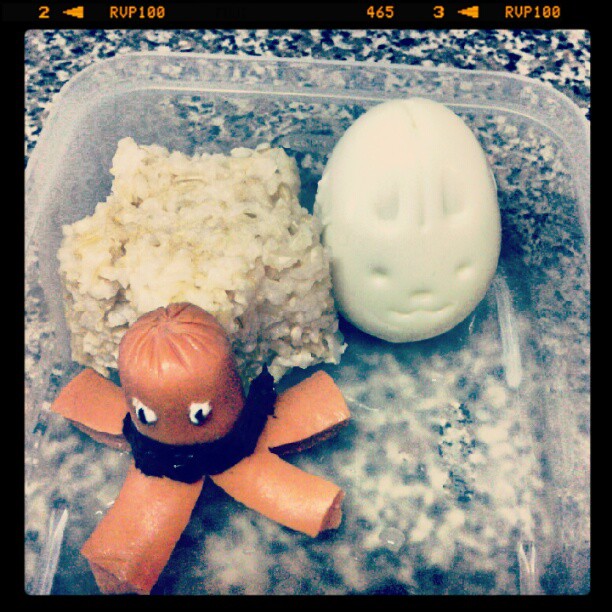
So I got up early this morning and took advantage of daddy being home, and let him keep the girly entertained while I slaved (and I mean this quite literally) in the kitchen for about 1.5 hours including cleanup, to create this!
I did boiled eggs which I molded into bunny and bear shapes. I did brown rice which was molded into heart and star shapes. I did a hotdog octopus with turkey dog. And I shredded some part skim mozzerella cheese and placed some carrots to take up some space.
Hubby left to visit with his kids and I was left with girly whom happily viewed the "masterpiece" (okay so I need to work on this a bit more, Im not fantastic...yet). She sat down and quickly informed me of everything she was NOT going to eat. Which ended up being everything but the egg. I wont lie, I fought back tears. Seriously??? I spent this much time trying to make your food appeal to you and you have the nerve to sit there and tell me you wont even TASTE a couple bites of each thing?
I am torn between making another one for her and tempting her and throwing my hands into the air, and screaming.
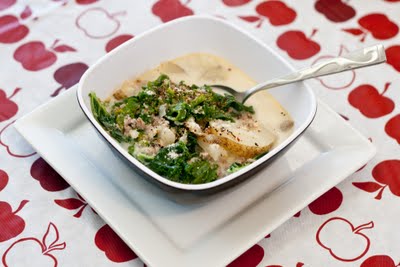
I am a huge fan of Cast Iron cooking. This awesome pot is a Cast Iron Dutch Oven with enamel coating. If you dont already have one of these - I suggest you hurry up and get one! I use it for all my cooking that will fit in there. It has such a nice even heating and such ease of cleaning. No need to season!The one I have is this on here -->Lodge Color Enamel Cast-Iron 6qt Dutch OvenIngredients:1lb Italian Seasoned Ground Turkey1 bunch Kale (the actual soup uses less - but we like more!)1 Red Onion, chopped5 medium Russet Potatos, sliced with skin on1c Half and Half4tbsp Turkey Bacon Bits2 cloves Garlic, minced5c Low Sodium Chicken Stock5c Water2tsp Red Pepper FlakesDirections:*Brown Turkey, drain, and set aside.*Saute onions, garlic and turkey bacon bits until onions are tender*Add 5c stock and 5c water (be sure and scrape the bottom of pot to get that yummy flavor*Bring to boil and add sliced russet potatos with skin and boil for 30 min till tender*Add turkey, and chopped Kale, and half and half and heat through - serve.
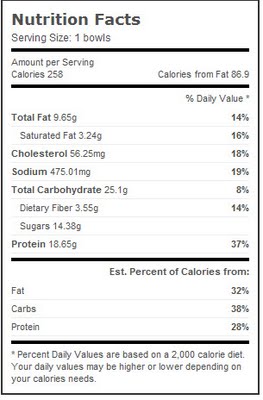
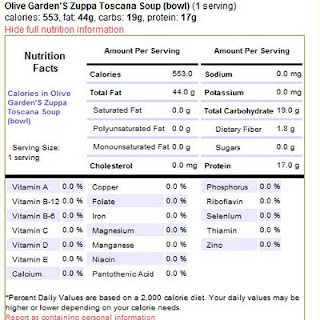
MY RECIPE'S NUTRITION INFORMATION Below is Olive Garden's Nutritional Info - Big difference if you ask me!
Strawberries are on sale right now due tot he holiday coming up - and then you can buy a container of dipping chocolate for $3. This will work on about 3lbs of strawberries - so if you want a frugal way to do Valentines but still look fancy and romantic - this is a fantastic idea! It's a lot more expensive to buy them pre-dipped. Also - they have white chocolate so you can decorate with both - or color the white and make it match other holidays etc.
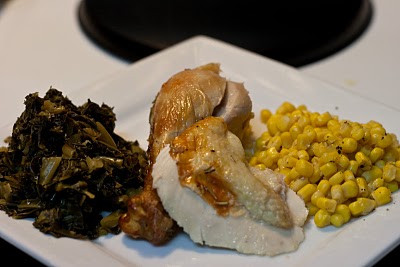
I made roast chicken rubbed in EVOO, Salt, Pepper, Rosemary and Garlic! And then for good measure I poured some white wine into the cavity!:) It was super juicy, with a delicious crisp skin! Hubby loved it!
Then I added some yummy collard greens, and corn.
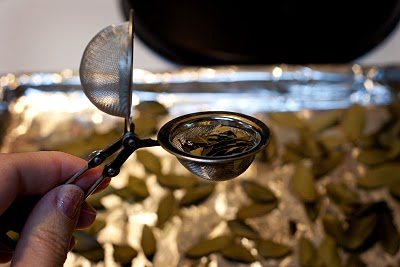
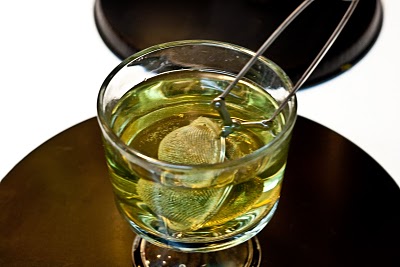
This is a plant that is EVERYWHERE in Texas. In fact, I challenge you to walk a mile and not see at least one of these. The cool thing about Yaupon is it's FREE because it's practically a weed, and it's got the highest concentration of caffeine of all the "weeds" in fact it's been said to have more caffeine than tea. When all the world goes to hell in a hand basket - here's your fix!
Yaupon Leaf Tea:
Ingredients:
Yaupon Tea Leaves (1tbps per cup water)
Tea Ball for loose leaf tea
Honey for sweetening
Lemon for flavor
Directions:Harvest Yaupon leaves and roast at 200 for 2 hours, then crumble in a baggie and use 1tbsp per cup water. Steep 10-15 min in boiling water, then sweeten and flavor.***Has as much caffeine as 10 cup coffee (supposedly) so use no more than 1 cup at a time. And be POSITIVE of your wild plant identification. In fact, it's free to have it checked by your local county extension. If you think you have Yaupon have it checked for positivity and stay away from berries which will cause vomiting.
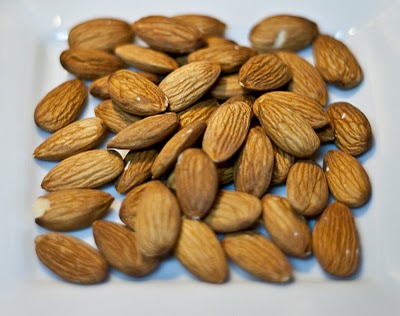
Why make Almond Butter when you can buy it in the store? Well...do you like to pay nearly $5 for a jar of almond butter that costs you about $1.60 to make yourself (we get a 48oz bag of almonds from Sam's Club for $10.40 - Don't have a Sam's, check online!)? If so, please go ahead to your store! I won't stop you! But, if you are like me and enjoy saving money, and you want something without added salt and preservatives, then why not make it at home? It's so simple you could do it on a work night!
Why are we even making Almond Butter? Aside from the obvious health benefits attributed to the Almond (see links at bottom for more on that), my daughter had an allergy test last year and the ones that "pinged" were Eggs, Almonds and Cow Dander. Cow Dander was the worst reactor (I know, strange!) but with the dangers of peanut allergies, even mild ones, turning into something much more serious has convinced us (with the help of this weekends rash and swelling after peanuts) that we need to cut as much peanut out of our lives as possible.
Little Girl, LOVES her peanut butter however, so we decided to try out Almond Butter!:)
Ingredients:
2 cups Whole Almonds (do not get chopped, slivered etc. they may be rancid)Almond, Coconut, or Olive OilHoney, Splenda, Torani etc. (optional)A food processor
Directions:
*Place almonds on a cookie sheet and roast in a 400 degree oven for 8-10 minutes.
*Nuke a half cup of chosen oil in microwave till about 110 degrees...this doesn't take long
*Place almonds directly into processor still warm. Pulse until they have the texture of a moist flour.
*Turn on low, add VERY SLOWLY some of the oil and let it mix in. If it looks like butter then stop. If still to dry, add a little more .It's not an exact science, just add a little and watch.
*Once it looks like butter, then you can add sweetener, whether that is honey, splenda, agave etc.Store in a tightly shut jar on the shelf for UP TO 30 days, or in the fridge for up to 3mths. Just remember this is a natural butter, no preservatives. It's normal to see some seperation of oil from nut after it has been sitting, simply stir and use as normal!:)
**Almonds have a lot of oils in them and can go rancid, the times of storage are variable as to your home temps etc.
***You can also add other flavorings into your butter, we like Cinnamon.
****A friend of mine, whose grandson has a terrible peanut allergy has found out that Chick-Fil-A uses Peanut Oil, but it's denatured and SAFE for those with nut allergies!
Links to Health Benefits of Almonds:
http://www.organicfacts.net/health-benefits/seed-and-nut/health-benefits-of-almonds.html
Ingredients:
1 medium Yellow Squash, quartered1 medium Zuchinni, quarteredHandful of Carrots (I used baby carrots)1 Turkey Fillet Mignon (got ours from HEB, see more below about that)Mrs. Dash Seasonings of your choice
Directions:
*Place Turkey Fillet Mignon in baking pan in a 375 oven for roughly 40 minutes or until it reaches 180 internally, AFTER seasoning to your liking with Mrs. Dash seasoning.
*Marinate your veggies in marinade of your choice, Italian Dressing (lite) works great!
*Place veggies in your steamer, or you can stir fry them, which I did.
*When all are done, arrange on plate and serve!
***Fillet Mignon is never cheap, but if you learn how your super market marks down their meat, then you have learned a good tip, indeed! We rarely buy meat at whole price (except my boneless skinless chicken thighs). Our local HEB will mark down their meats for "Quick Sale" the day before the expiration date. So if you keep an eye out on the cuts you like, and see when most will expire, you can head to the grocer first thing in the morning on the day that is before and get them, throw them in your freezer and then you have the tenderest meat for 50-70% off!
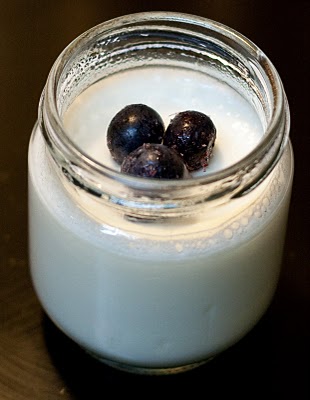
Ingredients:
1 liter Borden Plus Hi-Protein Milk (or whatever milk you have)3oz Plain Yogurt of your choice (FAGE greek 0% Yogurt)Whatever fruit/sweeteners that you wish!
Directions:
*Wash all ustensils with warm soapy water and dry completely. You want to breed the good live cultures, not the bad! I usually wash my pot, spoons etc with soap and then rinse with White Vinegar and then rinse again.
*Place milk in pot and bring to a boil (don't wanna boil? See tips at bottom), stirring constantly so as not to scorch the milk. After brought to boil, turn off heat completely, and let it sit and come down to 110 degrees. If you don't wanna wait, you can fill your sink with ice water, and plunge the pot in cold water. Keep an eye on the temps - if it gets below 110 you will have to heat again.
*In a seperate bowl, temper some of the milk into the yogurt. If you don't wait for the milk to cool first, you will kill the cultures. After you have tempered it and it is smooth, stir the culture into the large pot of milk. When this is well mixed - place lid on, then wrap in a thick towel, to retain it's temp. Some choose to set the pot on a heating pad on low...this is a pretty good idea if you keep your home cold.
*Let the milk sit undisturbed for at LEAST 6 hours. This will give you a light tang. If you want it tangier, let it sit a few more hours. I wouldn't go more than 12 hours.
*Chill for a couple hours, then serve with whatever sweeteners and flavorings you wish.
TIPS:
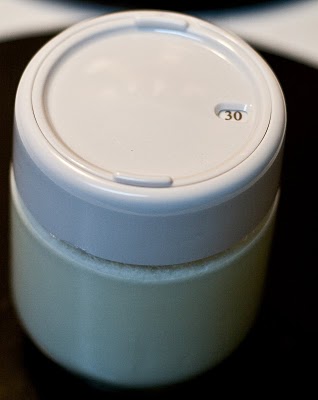
**Powdered milk gives yogurt an added Protein boost, and also thickens the yogurt in the same way Manufacturerers use Pectin. On your first batch start with 10 table spoons.
**Don't wanna boil cause you don't have time or are super duper lazy like I am? Heat the milk to 110, remove from heat, and follow instructions. You DEFINATLY wanna add powdered milk if you do it this way, because it wont be as firm as boiled.
** Wanna keep your sweeteners healthy? Try Agave, Torani or DaVinci Sugar Free Syrups, Honey etc. You can even use Sugar-Free Jams, though I suggest you heat them slightly before stiring into your yogurt cause it will help the mix.
**Picky kidlet that doesn't wanna eat yogurt? Let them pick their toppings, or bribe them like I do by letting them color their yogurt with food coloring!
|


 RSS Feed